Understanding and Implementing A Recurrent Neural Network

This blog helps you to understand the Recurrent Neural Network and implement Recurrent Neural Network using Pytorch.
Recurrent Neural Network’s behaviour is to remember the information for periods of time.
How it Remembers the information? It creates the networks with loops in them, Which allows it to carry the information.
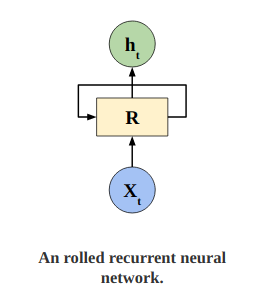
In the above diagram, A piece of neural network, R, Takes a input Xt and outputs a value Ht. Loops allows the information to be passed from one step of network to another step of network.
You can think of A recurrent neural network architecture, comprise of multiple copies of same network connected to each other and passing the information from one to another.
The basic equations that defines RNN is shown below 
Where, xt is input at time t,ht is hidden state at time t,h(t-1) is hidden state of previous layer at time t-1 or the initial hidden state.
Here, If we look into our architecture, It takes input at time t and hidden state of previous layer at time t-1, does the transformation/calculation and gives us output to use it for next network.
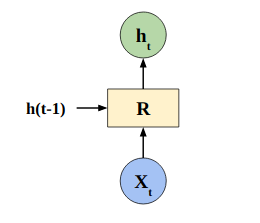
Same repeat for every time steps.
For those of you who like looking at code here is some code.
1
2
3
4
5

rnn = nn.RNN(10, 20, 2)
input = torch.randn(5, 3, 10)
h0 = torch.randn(2, 3, 20)
output, hn = rnn(input, h0)
Now let’s build Recurrent Neural Network using PyTorch framework.
1
2
3
4
5
6
7
8
9
10
11
12
13
14
15
16
17
18
19
20
21
22
23
24
25
26
27
28
29
30
31
32
33
34
35
class MyRNN(nn.Module):
    '''Building RNN using PyTroch'''
    def __init__(self, input_size, hidden_size):
        '''
        Args :
            input_size :Size of embeddings. (batch,seq,embeddings)
            hidden_size : Hidden size, to transform the embedding to this shape

        Returns :
            output : output features (h_t) from the last layer of the RNN
            hn  : final hidden state
        '''
        super(MyRNN, self).__init__()
        self.hidden_size = hidden_size
        self.ih = nn.Linear(input_size, hidden_size)
        self.hh = nn.Linear(hidden_size, hidden_size)
    def calulate_ht(self,x,prev):
      '''calculate ht using formula given above'''
        wih = self.ih(x)                    # eq1 = xt*Wih
        whh = self.hh(prev)                 # eq2 = h(t-1) * Whh
        combined = torch.add(wih, whh)      # eq3 = eq1 + eq2
        hidden_state = torch.tanh(combined) # tanh(eq3)
        return hidden_state

    def forward(self, x):
        batch_sz,seq_sz,_ = x.size()
        prev = torch.zeros(batch_sz, self.hidden_size)
        hidden_seq = list()
        for i in range(seq_sz):
            xt = x[:,i,:]
            prev = self.calulate_ht(xt,prev)
            hidden_seq.append(prev)
        hn = hidden_seq[-1].view(1,batch_sz,-1)
        output = torch.stack(hidden_seq,dim = 1).view(batch_sz,seq_sz,-1)
        return output,hn
I have implemented RNN model and also I have verified the output comparing with PyTorch nn.RNN module.
Below are the results of output features (h_t) from the last layer of the RNN. I am comparing my RNN built from scratch results with Pytorch nn.RNN module results.
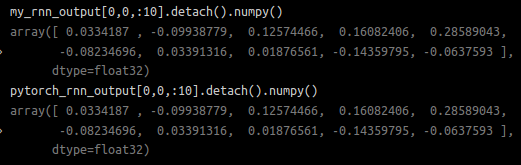
If we see the results. both output features of last layer are same.
Now let’s see the results and compare for final hidden state for each element in the batch.
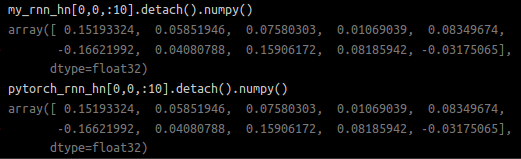
Great!, All value are same. We did it. Below is code. You can checkit out.
This way the RNN works.
RNN helps wherever we need context from the previous input.
Source code : GitHub Code
If you want to know, how you can use RNN/LSTM’s to train your model. Here is the project of binary classification using LSTM : Sentiment Classificaiton and Word Embedding